<업무 복습>
엘라스틴 서치를 사용하던 중, Doc를 CSC로 추출해달라는 요청을 받았다. 엘라스틴 서치는 RDBMS의 추출쿼리 같은 방법은 못 찾았고(?) 별도의 도구가 있다고 찾았다. 그것이 Logstash이다. 이밖에도 다양한 Log(System, Application 등)와 입력되는 많은 종류의 데이터를 가공해준다고 한다.
===================================================================================================================
1. 개요
Logstash는 입출력 도구이다. 다양한 종류의 로그 (System logs, webserver logs, error logs, application logs) 뿐만아니라 입력되는 모든 종류의 데이터를 가공하여 출력할 수 있다.
Elasticsearch와 궁합이 잘 맞아 지금은 Elasticsearch의 공식 패키지에 포함되어 있다고 한다. 이제 그 Logstash 설치해보고 기본적인 개념들을 살펴보도록 한다.
2. Logstash 설치와 간단예제
일단 설치해보자.
1) download
$ wget 'http://download.elastic.co/logstash/logstash/logstash-1.5.1.tar.gz'
2) 압축풀기
$ tar -xvzf logstash-1.5.1.tar.gz
끝났다(..) 정말이다.
Logstash는 위에서 언급했듯이 입출력 도구이며,
input > filter > output 의 pipeline구조로 구성되어있다.
- Influxdb에서 Telegraf 역할을 하는구나
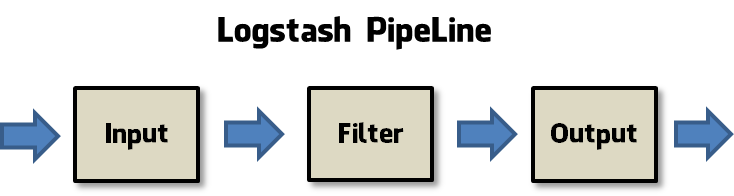
- input : 데이터를 받아들인다
- filter : 데이터를 가공한다
- output : 데이터를 출력한다
이러한 input, filter, output 설정은 직접 configuration 파일을 작성하여 설정해야하는데,
문법은 아래와 같다
input {
        .
        .
        .
}

filter {
        .
        .
        .
}

output {
        .
        .
        .
}
엄청 간단해 보인다. 하지만 어떤 기술이든 마찬가지로 기본은 쉬워보이는법,, 조금만 파고들어가면 걷잡을 수 없이 미로를 헤맬수 있다.
여튼 가장 기본적인 설정 즉, 입력은 stdin, 출력은 stdout 으로 설정하여 어떤식으로 입출력을 처리하는지 살펴보자. 일단 설정파일은 아래와 같이 매우 간단하다.
$ cat logstash.conf
input {
        stdin { }
}

output {
        stdout {
                codec => rubydebug { }
        }
}
주목할 부분은 stdout 설정에 codec을 추가했다는 것이다. rubydebug는 출력을 보기좋은 포맷으로 바꿔 준다.
이제 logstash 압축을 해제한 디렉토리의 /bin 디렉토리로 이동하여 아래와같은 명령어로 conf 파일과 함께 실행 시킨다.
$ ./logstash -f [configuration file path]/logstash.conf
실행이 되었으면 stdin 으로 'Hello world'를 입력해보자
$ ./logstash -f logstash.conf
Logstash startup completed
Hello world!
{
       "message" => "Hello world!",
      "@version" => "1",
    "@timestamp" => "2015-07-21T11:47:37.140Z",
          "host" => "cweb02.ami"
}
표준 입력으로 Hello world! 라는 문자열을 입력했고, 표준 출력으로 출력이되며 rubydebug 코덱으로 인해 json 형식으로 출력된다. 이때 message, @version, @timestamp 등의 필드는 Logstash에 내장 되어있는 필드라고 볼 수 있다.
input, output 플러그인의 종류는 매우 많다. 물론 데이터의 출력과 동시에 Elasticsearch에 색인작업을 해주는 elasticsearch output plugin도 존재한다.
아래의 문서들을 참고하자!
- input plugins : https://www.elastic.co/guide/en/logstash/current/input-plugins.html
- output plugins : https://www.elastic.co/guide/en/logstash/current/output-plugins.html
- codec plugins : https://www.elastic.co/guide/en/logstash/current/codec-plugins.html
filter 설정을 적용하면, 입력으로 들어온 데이터를 가공하는 작업을 수행한다. 예를들어 json 형식으로 데이터가 입력되었다면 필드를 삭제, 추가하거나 필드의 값을 조작할 수 있다. 여기서는 json 데이터를 가공해주는 json filter를 적용해보자.
아래와 같이 conf 파일을 수정한다
input {
        stdin { }
}

filter {
        json {
                source => "message"
                add_field => { "new_field1" => "New field value!"  }
                add_field => { "new_field2" => "My name is %{name}" }
                remove_field => [ "useless_field" ]
        }
}

output {
        stdout {
                codec => rubydebug { }
        }
}
filter로서 'json' filter를 추가했다. source 설정은 가공할 데이터가 들어있는 field를 가리킨다. add_field는 말그대로 field를 추가하는 것으로서, static한 고정값을 가지고있는 field를 추가할 수도있고, 기존 source의 데이터의 필드값을 '%{field이름}' 을 사용해 접근할 수 있다.
이제 이러한 설정을 저장하고, 실행한 뒤 표준 입력으로 json 포맷을 던져보자.
$ ./logstash -f logstash.simple.conf
Logstash startup completed
{ "name" : "timmy", "address" : "boston", "useless_field" : "garbage value" }
{
       "message" => "{ \"name\" : \"timmy\", \"address\" : \"boston\", \"useless_field\" : \"garbage value\" }",
      "@version" => "1",
    "@timestamp" => "2015-07-21T12:03:38.577Z",
          "host" => "cweb02.ami",
          "name" => "timmy",
       "address" => "boston",
    "new_field1" => "New field value!",
    "new_field2" => "My name is timmy"
}
{ "name" : "timmy", "address" : "boston", "useless_field" : "garbage value" } 와 같은 json 데이터를 표준입력을 통해 입력했다. name필드값으로 'timmy', address필드값으로 'boston'을 입력하였고, 필드 삭제 예제를 위해 'useless_field'도 추가했다.
결과는? 입력된 값 바로아래에서 볼 수 있다. 일단은 위에서 설명한것처럼 message, @version, @timestamp, host 필드는 Logstash의 내장 필드이다. 그 아래로, name과 address가 정상적으로 출력되고 있고, remove_field 설정으로 인해 'useless_field'는 삭제되었다.
그리고 add_field 설정에서 정의된 new_field1, new_field2 필드들이 새로 추가 되었으며, 주목할만한건 new_field2 의 값인데, %{name} 와 같이 기존 데이터의 필드의 값을 접근하여 새로운 필드의 값으로 저장된 것을 볼 수 있다.
짐작했겠지만 다양한 종류의 데이터를 가공하기 위해 필터의 종류도 매우 다양하다. 아래를 참고 하자.
fileter plugins : https://www.elastic.co/guide/en/logstash/current/filter-plugins.html
3. 결론
아무튼 Logstash는 input, filter, output 의 파이프라인 구조로 되어있다는 점, 더불어 input과 output의 한 부분으로 동작하며 데이터를 변화시키는 codec도 기억하면 좋을 것이다.
출처 1 :http://asuraiv.blogspot.com/2015/07/elasticsearch-logstash.html
--------------------------------------------------------------------------------------------------------------------
'운영체제 > 리눅스' 카테고리의 다른 글
| [ElasticSearch] Logstash의 input plugin으로 ElasticSearch 설(레퍼런스 I스크랩) (0) | 2018.10.14 |
|---|---|
| [Centos & Ubuntu] 쌈바(samba) 설치 (0) | 2018.08.19 |
| [Centos7] FTP & SFTP 설치 (0) | 2018.08.19 |
| [Ubuntu 18.04] 고정 ip 할당 (0) | 2018.08.19 |
| [Centos7] 고정 ip 할당 (vmware 내 서버) (0) | 2018.08.19 |
